Thursday 30 August 2012

Langoši (Lángos)


This delicious Hungarian fried flat bread is the most popular Central European street food. In the old days, the traditional lángos was baked outdoors in front of flames of the brick oven and served topped with sour cream and cheese for breakfast. Modern cooks adopted a faster method with yeast dough fried in oil. In Hungary, Austria and Romania lángosi are often cooked at fairs and festivals, served with variety of toppings. In Czech Republic, Slovakia and Croatia you’ll find langoši in snack bars, and in my family - they are served as the ultimate party appetizers. 


Ingredients:

Yields about 15 medium sized pieces

500g plain flour
7g (1 tbsp) active dry yeast
250ml plain yoghurt, at room temperature
200ml milk, warm
1litre vegetable oil (sunflower or canola)
Salt

Method:
  1. Prep the yeast first. Warm up a big metal mixing bowl and pour in all the flour. Make a well in the centre, add yeast and mix in the warm milk. Cover with cling film and let stand at the warm place for about 10-15 minutes.
  2. When the yeast has foamed up, add the yoghurt and mix into a very sticky dough. Work the dough for about 5 -10 minutes with a wooden spoon and refrain from adding flour, it’s meant to be quite soft and sticky. Splash with a little oil, cover with cling film and let the dough raise overnight (or for at least 5-6 hours).
  3. When the dough has more than doubled in size, punch it down and make the langoši. Grease your hands with a little oil, pinch off some dough (a bit bigger in size than a golf ball), roll it in your palms and then stretch it out with your fingers. The dough will be quite elastic and easy to shape. Make it thinner in the middle and about 1 cm thick at the edges, and then place each flat piece into the hot oil.  Make sure the oil is quite hot and that there is enough room for langoš to quickly drop down to the bottom of the pan and then immediately rise up to the surface, where it will puff up and remain floating.
  4. Fry each side for about 2 minutes, until it is golden brown and nicely crisp (it will soften as it cools down).  When each langoš is fried place it on a paper towel to absorb the excess grease.
  5. Salt them while they are still warm, and ideally let them cool down before serving.

Tuesday 28 August 2012

Baklava


This syrupy dessert is an absolute epitome of oriental decadence. The recipe has been floating around the noble kitchens of the Middle East and Eastern Mediterranean for centuries, but today’s popular form has been adapted from the ancient original in the Ottoman imperial kitchen at the Topkapi Palace in Istanbul. It is considered a national dish in Turkey, Greece, Egypt and Armenia, and each country proudly treasures its own favourite recipe. I’ve always liked the traditional Turkish baklava, until I’ve tried the Egyptian one and got permanently seduced by its aromatic sweetness. The key elements are exactly the same, but the Egyptian secret lies in two additional ingredients that suit my taste buds, cinnamon and orange blossom water.  Heavenly! 


Ingredients:

Yields about 20 square slices

400g walnuts, coarsely ground
100g unsalted pistachios, finely chopped
80g brown sugar
2 tsp cinnamon
20 sheets filo pastry
80g butter, melted

Syrup:
375ml (1 ½ cups) water
200g (1 ½ cups) caster sugar
2 cinnamon sticks
1 whole lemon, juice only
2 tbsp orange blossom water

Method:
  1. Make the syrup first as it needs to cool completely before pouring into the slices. Combine water, sugar, lemon juice and cinnamon sticks in a pan, and cook over a low heat until sugar dissolves. Bring to a short boil, stir in the orange blossom water, remove cinnamon and set aside to cool.
  2. Preheat oven to 180°C. Grease 20cm x 30cm baking tray with oil. Combine the nuts, sugar and cinnamon.
  3. Begin assembling the pastry stacks by layering 5 filo pastry sheets, brushing each with butter first, then placing into the baking tray. Top with one-third of the nut mixture. Repeat layers, finishing with filo, and lightly butter the top pastry sheet.
  4. Dip a sharp cutting knife into hot water, and then cut baklava into square shapes. Do not cut all the way through, but only about half way – that will allow the top layers to nicely puff up during baking. Bake for 30-40 minutes, until golden brown.
  5. Now cut the slices all the way through, and then pour half of the cold syrup along the cut lines and let cool slightly, allowing the bottom layers to soak up the liquid. Then pour in the rest of the syrup along the lines, and let baklava cool down completely before serving.

Sunday 26 August 2012

Greek Moussaka


This soft and rich dish takes time to put together, but it is so worth the trouble. The cooking method of stacking individually cooked layers suggests this dish to be of Middle Eastern origin. Carried down trading routes, the recipe was introduced to the East Mediterranean, where it got adopted as a traditional dish of several regional cuisines. But essentially, moussaka is to Greece what lasagna is to Italy. A casserole staple. This particular recipe would also be quite acceptable in the Balkans, where moussaka is very popular, though it is usually made with beef. Living in New Zealand made the great quality lamb mince ready available, making moussaka a regular dish on our late summer menu. 


Ingredients:

Serves 6

Meat sauce
500 g minced lamb
2 Tbsp olive oil
1 chopped onion
4 chopped garlic cloves
1 tsp ground cinnamon
1 tsp ground black pepper
1 Tbsp dried oregano
2 Tbsp thick tomato paste
1/2 cup red wine
1 lemon, zest and juice
Salt to taste

Béchamel sauce
100 g unsalted butter
1/2 cup flour
1 teaspoon salt
3 cups milk
2 egg yolks
1/2 teaspoon ground nutmeg

Moussaka
3 large aubergines (eggplants)
1/2 cup salt
8 cups water
4 large white potatoes
1 cup grated mild cheese
Olive oil

Note: If you’re not a fan of aubergines, this dish can be made with zucchini (5-6 cut lengthwise) using the same cooking method.

Method:
  1. Prepare the meat sauce. Heat the olive oil in a large sauté pan over medium heat and brown the meat. Add the onions about halfway into the browning process. Sprinkle salt over the meat and onions.
  2. Once the meat is browned and the onions have softened, add the garlic, cinnamon, black pepper, oregano and tomato paste. Mix well and cook for 5 minutes.
  3. Add the red wine and mix well. Bring the sauce to a simmer, reduce the heat and continue to simmer gently, uncovered for 20 minutes. Turn off the heat. And taste for salt, add more if needed. Add the lemon zest and the lemon juice. Mix well and set the sauce aside.
  4. Prepare the potatoes and eggplants. Mix the 1/2 cup salt with the 8 cups of water in a large pot or container. This will be the brine for the eggplants.
  5. Slice the top and bottom off the eggplants. Cut thick strips of the skin off and slice the eggplant into 1 cm thick rounds and drop them into the brine. Let the eggplants sit in the brine 15-20 minutes, then remove them to a series of paper towels to dry.
  6. Peel and slice the potatoes into 1cm thick rounds. Boil them in salted water for 5-8 minutes; you want them undercooked, but no longer crunchy. Drain and set aside.
  7. Place the eggplant rounds on the foil and brush with olive oil. Bake in the preheated oven for 3-4 minutes until lightly browned on one side, then flip them over and bake for a few minutes more. Set aside.
  8. Prepare the béchamel. Heat the butter in a small pot over medium heat. When the butter has completely melted, slowly whisk in the flour. When the roux is pale brown, slowly pour in the hot steamy milk, stirring constantly, until the sauce is thick and smooth in consistency. Beat egg yolks in a separate bowl and then slowly pour into the sauce, stirring vigorously. Add about a teaspoon of salt and the nutmeg. Stir well, and set aside.
  9. Finish the moussaka. Preheat the oven to 220 C. Ladle a thin film of  béchamel sauce to the bottom of the casserole dish and then layer half of the potatoes, overlapping slightly. Top the layer of potatoes with a layer of eggplant slices (use just half of the slices).
  10. Cover the eggplant slices with the meat sauce. Then layer remaining eggplant slices on top of the meat. Then add another row of potatoes. Sprinkle half the cheese on top. Ladle the béchamel over everything in an even layer. Sprinkle the rest of the cheese on top.  Bake for 30-45 minutes, or until the top is nicely browned.
  11. Let the moussaka cool for at least 15 minutes before serving.

Saturday 25 August 2012

French Salad (Vegetarian Olivier Salad)


It is a Russian national dish and they call it the Olivier Salad. Eastern Europe, where this is a traditional New Year's side dish, calls it the Russian Salad. Central Europe, however calls it the French Salad. It was invented in 1860 by Lucien Olivier, a Belgian Chef and owner of the Hermitage Restaurant in Moscow. Original  salad was a very complex ensemble of expensive ingredients. But the key to the recipe, secret Provençale dressing, Olivier took with him to his grave. At the turn of the century enterprising Russians adapted the dish for mass production, cutting out the luxuries and replacing the dressing with French style mayonnaise. Further adaption removed the meat and due to the high amount of mayonnaise was named the French Salad. Voila!


Ingredients:

Serves 8-10

5 medium sized white potatoes, cooked, cooled, peeled, diced
5 carrots, cooked, cooled, diced
2 cups garden peas, cooked, cooled
6 boiled eggs, diced
6 large dill pickled gherkins, diced
8 heaped tbsp thick European style mayonnaise
1 tsp Dijon mustard
Salt and pepper
Optional: sour cream, chopped dill or parsley

Note:  This is a very adaptable dish - it has been almost completely transformed from the original Olivier's Salad which contained lettuce, caviar, crayfish tails, veal tongue and smoked grouse, practically only the vegetables were retained, so obviously, it can be well adapted to personal tastes. Celery stalks can add a nice crunch to the salad, as well as green apple. Though, a really good, high quality, creamy European style mayonnaise is the main secret for this dish to be an absolute success. Do not substitute with French Salad Dressing or Sauce Tartare, they are too thin to hold the vegetables.

Method:
  1. Cook all the vegetables and eggs separately, so each vegetable retains its distinctive taste. You can cook the veggies ahead, as the salad has to be assembled with all the ingredients well drained and completely cooled.
  2. In a large mixing bowl start combining ingredients: diced potatoes, diced carrots, diced gherkins, peas, diced eggs. Fold in the mayonnaise and Dijon, making sure you do not break or squash the veggies.  If the finished salad looks as if it needs more dressing, add a dollop of sour cream.
  3. Season well, and garnish with chopped dill or parsley. Serve chilled.

Note: For the Russian Salad just add a cup of diced pressed ham, or smoked chicken, to the above ingredients.


Friday 17 August 2012

Cinnamon Rolls


A cinnamon roll is a sweet yeast pastry served abundantly in cafés and homes throughout Northern Europe. In Sweden, the country of its presumed origin, the 4th October has more recently been promoted into "Kanelbullens Dag" (Cinnamon Roll Day). However, my closest relation to Scandinavia is passion for Swedish crime novels, in which clever detectives solve grisly crimes while chewing on cinnamon rolls and drinking buckets of coffee. An avid coffee drinker myself, I’ve been long looking for a delicious treat to nibble on while reading. My interest was sparked, and after I realised just how incredibly easy they are to make, I acquired passion for cinnamon rolls. But beware, they are highly addictive. My whole family has fallen victim to this buttery little treat and soon we might even start celebrating the Kanelbullens Dag. 


Ingredients:

Serves: 12-14 rolls 

Dough:
400gr flour
7gr (1 Tbsp) dry active yeast
200ml lukewarm milk
40gr caster or soft brown sugar
70gr soft unsalted butter
1/4tsp salt
2 tsp ground cardamom (not a fan - substitute with 2tsp grated lemon peel, it does the trick)

Topping:
100gr soft unsalted butter
70gr caster or soft brown sugar
1Tbsp cinnamon

Method:
  1. Put the flour into a bowl, add the yeast, pour in some milk and mix up with the yeast. Cover it and rest for 10 minutes.
  2. Add the other ingredients for the dough and knead everything into smooth dough. Cover and let it rise for at least 30 minutes (1 hour is better).
  3. Gently press dough down and, on a floured surface, roll into a roughly 30x70 cm rectangle. Mix the ingredients for the filling and spread evenly on the dough. Roll up from one long side, and then cut your roll into 2 cm thick pinwheels.
  4. Press down the flat side of the knife in the middle of the rolls, so that the centre goes down and the cut sides open up a bit.
  5. Put rolls on a parchment baking sheet and let them rise for another 10 minutes or so. Preheat the oven to 220C, egg-wash the rolls and bake for about 12 minutes (do not over bake – they are meant to be just golden brown on the top, soft in the middle and a bit gooey on the bottom).

Note: In Sweden cafés freshly baked Kanelbulle gets topped with a pärlsocker (pearl sugar) not commonly used outside Northern Europe, so you’ll have to finish them off with a good old dusting of icing sugar (it does the trick). Or, omit this step completely as they do not really need any more sugar.


Thursday 16 August 2012

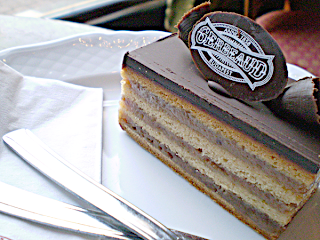
Gerbeaud Slice


This dessert was originally created for the iconic ‘Gerbeaud Café’ in Budapest. Established in 1858, the confectionery flourished when it came into possession of the inventive Swiss pastry chef Emile Gerbeaud, and soon developed into one of Europe’s finest coffee houses. Gerbeaud (Zserbó or Žarbo) slice has been a popular choice for festive baking in Central Europe for 100 years. My husband is a big fan of this sweet little dessert, and since ‘the way to man’s heart goes through his stomach’ I had no choice but to learn how to bake it. Best of all, it's easy to assemble, looks elegant and tastes amazing.


Ingredients:

Yields about 30 pieces, depending on the size of the slices

For the pastry:
170 g softened unsalted cultured butter, plus extra to grease pan
500 g plain flour, sifted, plus extra for rolling
4 tablespoons caster sugar
1 teaspoon lemon zest, grated
1 teaspoon bicarbonate soda
1/2 cup milk
7 g dried yeast (1 tbsp)
1 egg yolk, lightly whisked
2 tablespoons sour cream

For the filling:
300 g thick apricot jam
20 g cocoa
200 g caster sugar
200 g ground walnuts

For the chocolate glaze:
350 g dark chocolate
1 tablespoon unsalted butter

Method:
  1. Preheat oven to 180°C. 
  2. Sprinkle dried yeast and the teaspoon of caster sugar over warm (not hot) milk.  Mix and set aside in a warm spot for 10minutes.
  3. Rub the butter into the flour until the mixture resembles breadcrumbs. Add 4 tablespoons of caster sugar, lemon zest and bicarbonate soda and mix to combine.
  4. Make a well in the centre of the flour, then add the milk/yeast mixture, the whisked egg yolk and the sour cream and mix to make medium-soft dough. Knead briefly. Cover with a clean tea towel and set aside in a warm spot for 10-15 minutes.
  5. Prepare a 23 x 33cm slice tin by greasing it and lining it with baking paper. Cut the dough into three even-sized pieces. Press out into a rectangular shape and then roll out on a lightly floured board. Line the base of the tin with the first layer of pastry. Spread with a layer of the apricot jam (about half the quantity). Sprinkle with half of the combined cocoa and caster sugar and top with a layer of ½ the quantity of ground walnuts.
  6. Roll out the second sheet of pastry; layer it over the pastry with filling already in the tin. Spread another layer of apricot jam and finish off by sprinkling over the remaining cocoa and sugar mixture, followed by the remaining ground walnuts. Roll out the third sheet of pastry and place it on top of the layers in the tin.
  7. Bake in the oven for 30 to 40 minutes, until nicely browned. Set aside and allow cooling.
  8. To make the glaze, melt the chocolate and butter in a bowl over a pot of gently simmering water. Melt until well-combined and then pour evenly over the top of the slice. Use a spatula or palette knife to smooth it over. Set aside to chill. When the glaze has set, use a sharp knife dipped in boiling water to cut the slice into pieces.

Note: The slice is even more delicious the next day, as the flavours develop, and it keeps well in the  air-tight container for up to 2 weeks.


Wednesday 15 August 2012

Basic Goulash (Gulyasleves)


Hungarian shepherds (gulyas) were slowly cooking their beef stews in a large kettle, hanging on a tripod over the open fire, a few hundred years before everyone else caught on. They were the first lucky ones to enjoy this rich, brightly coloured and deeply satisfying dish. It was only right to name the dish after them, and perhaps even award them a Golden Ladle of Soul Food for the invention of Europe's most popular comfort food.


Ingredients:

Serves 4-6

1 kg beef chuck steak, cubed
2 tbsp vegetable oil or lard
2 large onions, finely chopped
3 tbsp Hungarian sweet ground paprika (for bite mix 2 tbsp sweet and 1 tbsp hot smoked paprika)
1 tbsp rich tomato paste
1 pinch of caraway seeds
1 pinch of marjoram
2 bay leaves
Salt 
4 large potatoes, diced
10 cups water (or beef stock for deeper flavour)

Optional: (due to the slow cooking process the vegetables will dissolve into the sauce)
1-2 carrots, chopped or diced
1 parsnip, diced

Egg dumplings:
2 eggs beaten
6 tbsp plain flour, sifted
1 small pinch of salt

Note: According to some unwritten rule, I've heard from several passionate Gulyas cooks and eaters over the years, from the original basic Gulyasleves ingredients you can take away a few (the vegetables, for instance), but never add a single one. Apparently the only thing you are permitted to add, is more meat! My friend’s Hungarian grandmother used to say that to cook a proper Gulyas you simply have to be at least one part Hungarian, and that’s the whole secret to it, everyone else has to follow the recipe!!
 
Method:
  1. Heat the oil or lard in a large heavy-based pan. Add the onion and cook until soft.
  2. Add the beef cubes to the pan and cook for 10 minutes browning the meat gently, stirring constantly to prevent it from sticking.
  3. Add caraway seeds, marjoram and salt. Remove from the heat and stir in paprika, add tomato paste and root vegetables (if you cook with them) and stir well before pouring in the liquid. Drop in the bay leaves and cook, covered, over a low heat for 1 ½ hours, or until the meat is tender.
  4. Add potatoes to the pan and cook for another 20-25 minutes stirring occasionally.
  5. Meanwhile, make the dumplings by mixing the beaten eggs together with the flour and a little salt. Drop the small spoonfuls of the dough directly into the simmering goulash and cook for 5 minutes or until they rise to the surface.
  6. Adjust the seasoning and serve hot. 


Monday 13 August 2012

Spätzle


German recipes including spätzle as a side dish date back to the 18th century, though the irregular shape and simple ingredients suggest, the noodle itself to be much older than that. These versatile Swabian ‘little sparrows’ flew far from their homeland in South Germany to win the hearts of many European nations and be served in addition to array of stews and saucy dishes. There is a bit of technique involved into the cooking method, and I must admit my first few attempts were quite messy, but after a while you get a hang of it. And when your son declares his love for you through a mouth full of spätzle, you just know it was well worth the effort.  


Ingredients:

Serves 4-6

3 cups all-purpose flour
1/2 tsp salt
Pinch of ground nutmeg
4 eggs
1 cup milk

Note: Of course, you can use a spätzle board or potato press, even a strainer to form your noodles. I saw a celebrity chef on TV using a ordinary grating board, so I tried it myself and after a while mastered the science of forming the dough into delightful little spätzle.  The fact that they do not need to look perfect to taste good is even more rewarding.

Method:

  1. Combine flour, salt and nutmeg. Beat eggs with milk and pour into the dough little by little, until a smooth batter forms. Let it rest for 5-10 minutes.
  2. Bring water with 1/2 teaspoon salt to a boil in a heavy saucepan. Plan on boiling at least 3-4 batches from this quantity.
  3. Set a coarse grating board (the one with large holes) over the saucepan and press the dough, a few spoonfuls at a time, through the holes directly into the water. Boil for 5 minutes until the noodles rise to the surface and are tender to the bite. Remove noodles with a slotted spoon and place in a sieve. Splash them with a bit of cold water to stop cooking, and then drain well.


Saturday 11 August 2012

Chicken Paprikash


In the 19th century Hungarian cooks discovered a secret ingredient for their stews. Expensive black pepper got replaced by humble paprika, growing abundantly in Hungarian gardens for hundreds of years. Paprika transformed simple peasant dishes into staple delicacies and Csirke Paprikas soon rose to fame by simmering in households all over the Austro-Hungarian Empire. A whole century later the original recipe still remains unchanged. Thanks to my Mum’s philosophy: you can't go wrong with paprikash, it was the first dish I ever learned how to prepare.

 
Ingredients:

Serves 4

6-8 whole chicken thighs (child friendly version: skinless and boneless tights cut into pieces)
1 big white onion, finely chopped
5 tablespoons sunflower oil (originally cooked with lard)
1 red pepper halved (chop the stem off and take out the membranes with seeds)
3 tbsp ground sweet paprika
Salt
200 ml water (if you cook with skinless/boneless meat use chicken stock for more intense flavour)

Serving suggestion: Paprikash and Spaetzle are a marriage made in heaven. Even simple egg noodles or puffs (as pictured) would beat by a mile any type of dry pasta.

Note: Don’t be shy to cook with lard (if you can get your hands on it). It’s pure and natural and adds deeper flavour to the dish. Goose or duck fat would also work a treat in this recipe.

Method:
  1. In the oil (or lard) first sauté the onion. When the onion is evenly translucent add the chicken. Turn your heat up high and brown the meat while stirring constantly.
  2. Add salt, ground paprika, mix well and top up with the liquid. Let it quickly boil and then turn down the heat to low, cover and let it simmer. After 10 minutes add pepper pieces and cook for another 20 - 30 minutes. Check the meat for tenderness.
  3. Take out the pepper halves before serving. Top each portion with a pinch of fresh chopped parsley and a generous spoonful of sour cream.
Important fact: 
Coating the chicken in ground paprika before cooking is a recipe for disaster, as soon as the meat hits the hot pan the paprika will burn and turn bitter.


Friday 10 August 2012

Buhtli


The origin of this delicious dessert is in the Czech-Bohemian cuisine where it is known as Buchtičky. This humble yeast bun has since the late 17th century made more triumphant conquests than any fierce army ever. If you take a look at the map of Europe and make a swiping gesture over the great Danubian basin you’ll cover the bulk of nations which have over the centuries dutifully yielded to the seductive scent of freshly baked Buchtičky, Buchteln, Buchty, Buhtli and Buhti. Entire Central Europe claims to be harbouring some secret ingredient for this dessert, but the only notable variation seems to be the size of the bun and, of course, the filling. Jam, cheese, fruit preserve, poppy seeds, walnut paste, vanilla or chocolate sauce, and more. My grandmother made them filled with plum jam and for me – that’s how it’s done! Nothing can erase the childhood memory of sinking the first big bite into the soft, still warm Buhtl, and the spurt of hot jam shooting out the side landing on my clean freshly pressed blouse.  Priceless. 


Ingredients:

Serves 6-8

400 g plain flour
200 ml warm milk
50 g caster sugar
7 g (1 tbsp) active dried yeast
100 g soft butter
1 egg
3 egg yolks
1 pinch of salt
1 lemon (grated rind only)
Plum jam (though, Apricot jam works nicely too)
Extra flour (for the work surface)
Butter (melted for brushing)
Icing sugar (for dusting before serving)

Method:
  1. Prepare yeast by mixing the lukewarm milk, yeast and 1/3 of the flour. Dust with a little flour and cover with a cloth. Leave to rise in a warm place. Then add the rest of the flour, sugar, egg and yolks, lemon rind and a pinch of salt. Knead into slightly tough dough, and then work in the butter. Knead well for good 10 minutes. Cover with a cloth and leave for 30 - 40 minutes in a warm place to rise until the dough has at least doubled in size.
  2. On a floured surface, roll the dough flat to about 1 cm thick. With a cutter, cut out square pieces about 6 cm in diameter. Place the small spoonful of the jam in the centre, fold and close the edges tightly at the top. Dip each piece one by one in the melted butter and place them closely side-by-side in a non-stick baking dish (with high sides) with the folded edge facing down. Cover with a cloth and stand to rise again for about 20-30 minutes.
  3. Bake in a preheated oven at 180 °C for about 30 minutes until golden yellow.  Dust them with icing sugar while they are still warm. Then leave them to cool slightly before separating and serving.

Stuffed Bell Peppers


There are so many twists to this classic dish that I believe every cook has an old gradually modified family recipe passed down by generations of passionate cooks. This particular recipe is preferred in the central Eastern Europe, though there is also a cooking method in the Balkans to top the peppers with sour cream and then bake in the oven. Peppers cooked in a rich tomato sauce was my Dad's favourite, and I always remember him hum and click his tongue while teaching me how to properly mop the plate clean with a piece of bread. 


Ingredients:

Serves 4

8 fresh green or red bell peppers 
350 g minced beef 
350 g minced pork
½ finely chopped red onion 
3 cloves finely chopped garlic
1 tbsp. chopped parsley
1 tbsp. ground paprika 
½ tsp. ground pepper 
1 tsp. salt 
100 g white rice (medium grain, uncooked)
4 tbsp. sunflower or canola oil
800 ml canned tomato puree
300 ml beef stock

Method: 
  1. Cut into the stem end and hollow out the peppers, then wash and rid them of membranes and all the seeds.  Drain well.
  2. Mix the meats and add the onion, 1 pinch of the chopped garlic, parsley, ground paprika, salt, pepper and rice. Combine the stuffing really well and then stuff the peppers. Don’t fill the peppers to the brim allowing the rice to increase in volume.
  3. Warm up a large pan with a lid, add oil and the rest of the garlic and sear the peppers on all sides. Add tomato puree and stock, put the lid on and then cook for 50 min on low heat. Check periodically and turn the peppers around, adding more puree or water if necessary (the sauce needs to be thick and silky). Taste for seasoning - add salt and pepper in necessary. 
  4. Serve with boiled or mashed potatoes. A fresh ciabatta style bread might also come handy to soak up the sauce. 


Pumpkin Gnocchi


At my place, the fast talking and wildly gesturing Italians always win the European Dumpling of the Year contest with their chubby little gnocchi. Traditional dough is made with potato, but the pumpkin is a sweet and colourful replacement. Serving is a matter of personal taste and you can just fold the gnocchi through sage leaves fried on butter. Or, cook some garlic, smoked bacon and green peas with lots of chopped fresh dill, then toss in the gnocchi. Whichever way you serve them, the meal is guaranteed to finish with a happy pat on a full tummy.


Ingredients:

Serves 4-6

1 cup of cooked and puréed pumpkin or squash
1 large egg
1/4 cup parmesan cheese
1-2 teaspoons of dried oregano
2-3 cups plain flour

To make your own pumpkin purée, use a strong knife to cut a small pumpkin (or butter squash) in half. Scoop out the seeds and strings. Cut the pumpkin in pieces, cut off the skin. Fill the pan with water just to cover the pumpkin cubes and boil them until tender (it doesn’t take long to cook 5-10 min tops), drain well and mash into a fine and silky smooth purée.

Note: The amount of flour you need to make the dough will vary depending on how moist the pumpkin or squash is after cooking. For more intense pumpkin taste make sure the cooked pumpkin in drained really well. Also, do not overcook it! Although it is tough to cut, it takes a lot less time to boil than the potatoes.

Method:
  1. Mix the pumpkin puree, egg, cheese and oregano in a large bowl. First add only 2 cups of the flour and mix well with a wooden spoon. You can try and work it with your hands but the dough will, and should be, very sticky, almost impossible to work. But don’t despair. Add another half or a full cup of flour and mix well to get a soft dough.  The dough will still be quite sticky, but manageable enough to shape into a large log. It shouldn’t require more than 3 cups of flour. Cover the dough with a damp cloth (the dough is not suitable to be left out for too long or refrigerate overnight).
  2. Bring a large pan of water to a boil, and then add a good spoonful of salt to it, so it tastes as salty as the sea.
  3. To make the gnocchi, spread some flour on a large work surface, but have more flour at hand. Cut the dough into 4 or 3 small log pieces.  Roll each log piece, gently with your palms, into a 3-4 cm thick sausage. Then cut them into 3-4 cm long gnocchi.
  4. Dust the gnocchi with some flour.  Hold a grater over the pan. By gently pressing and rolling each gnocchi over the grater, let them drop into the boiling water. This will create the ridges for the sauce to hold onto. This step is not really compulsory as it doesn’t improve the taste.
  5. Cook the gnocchi until they float, then remove them with a slotted spoon. Lay each batch in a cold dish and toss with a drop or two of olive oil so they don't stick together.


Thursday 9 August 2012

Apricot Dumplings


Sweet dumplings such as these are popular right across central Eastern Europe. The heavy potato dough makes a delightful and unusual contrast to the juicy filling. With the same effect they are often made with plums, but my grandmother made them with apricots. These dumplings are a part of my earliest gourmet memories as the most scrumptious follow up to a rich vegetable soup on a meatless Friday. Serving is a matter of personal taste and each dumpling can be lightly dusted with icing sugar and cinnamon or topped with a dollop of sour cream, or both!


Ingredients:

Serves 4-6

250 g starchy white potatoes, peeled
75 g unsalted butter
1 egg, beaten
130 g (1 generous cup) plain flour, sifted
16 small ripe apricots
3 tbsp granulated sugar
50 g white breadcrumbs
½ cup icing sugar mixed with ½ tsp ground cinnamon

Method:
  1. Boil the potatoes in a large pan until just cooked. Drain then mash them with 25 g (2 tbsp) of the butter. Leave to cool before adding the egg. Mix well then stir in the flour.
  2. Knead the dough until soft, on a lightly floured surface. Cover with cling wrap and chill for 30 min.
  3. Carefully ease the stone out of each apricot by slitting the apricots without cutting them in half. Once   the stone is removed push a ½ tsp of granulated sugar into centre of each apricot.
  4. Divide the dough into 16 even balls. Roll out each dough ball on a lightly floured surface to a thin  round. Brush the edges of each dough circle with water, place the apricot in a centre and wrap the dough around. Seal the dough to enclose the fruit completely.
  5. Bring a large pan of salted water to a boil, add the dumplings and simmer for 10-12 min. They will first sink to the bottom and then float up as they cook. When cooked remove them with a slotted spoon and drain well.
  6. Meanwhile, fry the breadcrumbs in the remaining butter in a pan until golden brown. While hot quickly pour fried breadcrumbs over the dumplings. Carefully fold so they get evenly dredged in breadcrumbs all over and dust with mixture of icing sugar and cinnamon. Serve them hot with a generous dollop of sour cream on the side.